The BEST Guide to POLAND
Unanswered  |  Archives 
 
 
User: Guest

Home / Life  % width posts: 16

Building: treatment methods of and understanding timber in Poland


SeanBM 35 | 5,797
8 Jul 2009 #1
There is a Knotting paint you get in Ireland that you paint on the knots on raw wood, so that when they are primed and painted the sap does not bleed through.

Does anyone know what I can buy here in Poland that does the same job?.
z_darius 14 | 3,964
5 Apr 2011 #2
Kinda much too late, but in case you decide to paint over knots again...

The name in English is shellac. In Polish it's szelak.
It can be had from here.
art-konserwacja.pl/szelak-5767
It's the best stain/knot blocker there is and many of the stain blocking primers contain it.

When bough in the flake form (MUST be de-waxed as in the link above) it need to be dissolved in de-naturated alcohol (DNA or methyl hydrate, at least 80%, the higher the better if used under clear coats on wood) in about 1:10 to 1:15 ratio. When working with DNA wear breathing protection and rubber gloves as the vapor is absorbed through skin and in sufficiently high concentration can affect some eye nerves causing partial or complete blindness. Hence an old Polish joke referring to hopeless alcoholics - let's drink faster cuz it's getting dark.

Rubbing alcohol (70%) or regular booze might be fine too for this particular application, especially if top coat if water/latex based paint.

Shellac dries in seconds if diluted in 99.9% DNA, a little longer with lower %. This sometimes may be a problem, so to extend the drying time turpentine (a natural and safe product) may be used as a retardant. I'd say 5 to 10 drops per 100ml of the shellac solution.

Once dried, shellac is perfectly safe as the VOC disappear completely. In fact, shellac is used for medication and candy coatings.
OP SeanBM 35 | 5,797
20 Apr 2011 #3
In Polish it's szelak.

Jainie Mack, thanks a lot Z_D.
I am going to be doing a load of wood in the coming months and this is perfect.

This szelak, is even better than the knotting stuff I was talking about, as the knotting is light brown, needs to be sanded and painted over.

Whereas szelak can be au natural, great!

I didn't use anything special on the knots for my terrace and it's south facing but even with the sun beating on it, the sap hasn't come out much, a little here and there. If you know, is this because the wood was probably dried properly?
z_darius 14 | 3,964
3 Jul 2011 #4
I didn't use anything special on the knots for my terrace and it's south facing but even with the sun beating on it, the sap hasn't come out much, a little here and there. If you know, is this because the wood was probably dried properly?

Kinda late again with the answer, but here it is.

It looks like the wood has not been fully dried indeed. This is rather typical of construction grade lumber as drying it is time consuming/costly, also with solar kilns, even though I built one for myself to save money (green lumber is much cheaper than dried). Drying time depends on lumber type. Air dried takes about a year per 1" of thickness. In my climate (roughly similar to that in Poland) the process is shortened to about 2 months in Summer. Speeding it up is not a good idea as too fast drying rate will cause cupping, cracking, bowing and checking. This will depend on the wood species. Some are easy to dry (oak) some are notoriously difficult (hickory).

I imagine you used some kind of pine for the deck. The Sun is now trying to push out of sap so it sips through.This can be remedied with turpentine. It's natural and it dissolves sap. Use a rough plastic sponge pad to work the turpentine into the affected area and scrape away the old sap resin. Sandpaper will work to but it will gum up quickly.

Some people suggest Goo-Gone (sold in Poland under the same name) but it has (to my nose) a pretty stubborn and unnatural scent. I'm also not sure how it affects adhesion of various top coats.
OP SeanBM 35 | 5,797
3 Jul 2011 #5
Air dried takes about a year per 1" of thickness.

22mm thick.

the process is shortened to about 2 months in Summer.

The tartak I got the wood from dries it in a kiln (of some kind) and it took three weeks.
And it will lie inside for approximately two and a half months before it's used.

.This can be remedied with turpentine.

Would that not also discolour the pigmented stain?

I imagine you used some kind of pine for the deck.

I bought Larchwood, as it was the hardest wood they had for a decent price.
It's not for decking but cladding part of the facade of the house and for the terrace banister.

Thanks for the tips D_Z.
z_darius 14 | 3,964
3 Jul 2011 #6
Sean,

the picture is a bit clearer now although not completely yet.

Larch is an awesome choice for outside application. It is a conifer hence a softwood, but the "soft" part of the word is just a part of classification. All conifers are softwoods but some are much harder than some hardwoods. I know, sounds silly.

Here's a few more tips, sorry if you're already aware of some of them.

The thing with larch is that it does need seasoning, even after kiln drying. The sap will ooze for some time. Based on the application I gather you have a few square meters of outside storage available to you. That's where it's best to store the wood for it to season properly. If you prefer to store it inside you need to make sure thee is enough air movement and ventilation for two reasons; if the wood is still relatively fresh it can stink up the house before it is fully cured. I tried that on my own house. Never ever store not fully cured lumber in the house, not even in the basement.

The time it takes to cure lumber will depend on the species and climate. 3 months may be enough if the wood is stored outside in warm weather and with nice air movement. The rule thumb is always test the finish you plan to apply to see if the sap is still a problem. With larch it often is for longer than with other lumber. It's kinda hard to hasten nature and sometimes if we do we pay the price.

To store wood you need to stack it properly. A plastic sheet on the ground to minimize, pinned down with a few bricks/cinder blocks. The plastic prevents moisture from the ground to enter the fibers, the blocks keep the wood above ground to allow air circulation. The lumber should not be in direct contact with the blocks even if there is plastic under them. Water from rain will be inevitably absorbed by the blocks and transferred into wood (capillaries).

Each layer of wood needs to be stickered i.e. separated from the other layers by small blocks of wood running perpendicular to the lumber. 12 to 18 inches is the recommended spacing, and about 1 inch (2.54mm) to 1.5 inches is the recommended height of the stickers. Even if you have only, say 5 boards, stack them on top of one another, don't lay them down next to one another. Once the lumber is stacked it needs to be covered with some cover to shield it from direct sun and rain action. The cover then needs to be weighed down with somewhat heavy material (bricks/blocs) to keep the cover from flying away and to minimize the warping of top layers of the lumber.

Sometime before you stack the lumber, if you do decide to do it, you need to inspect the boards' ends for checking. Checking is cracking of wood from it's end(s) towards the center. If there is any already in progress the boards need to be shortened to the point where there is no checking. Sounds like a little bit of a loss of material but if not done, checking may (MAY) go much further into the wood and ruin more of it. Once there is no checking at boards' ends those ends need to be painted over with some non-water based substance. Wax works very well, oil paint is great too. Use lots of it, as the end grain is very thirsty. It will penetrate about 1/4 to 1/2 inch into the fibers and it will keep the boards from checking. Use as much as needed. Too much is great.

Now back to the knots. These may cause long term problems other than oozing sap. Because their density and moisture content (MC) is often different than the surrounding area they dry at different rate and their movement may cause them to become loose and fall out. In order to stabilize them, transparent epoxy is used. If the knot goes through the thickness of the board then adhesive tape is placed on one side of the board and properly mixed epoxy is then gently poured into the spaces around the knot. The tape prevents the epoxy to sip through to the other side. Once dry (anywhere from a few minutes to a day) the epoxy will hold the knot in place. Because it is transparent it won't yield an ugly opaque look like typical wood filers do. Instead the knot's depth of color and figure will be preserved. In fact a like knots a lot and now, after I made a little step stool out of what I classified as scrap after I finished another project, wifey wants the knotty woods. They add charm and character. Of course it needs to go with style. Kinda hard t imagine a knotty Art Deco, or Queen Anne. An excess of epoxy needs to be scraped of with a sharp chisel of scraper. Sanding it away will cause gumming. At any rate, knots have to by dry, no sap. Otherwise epoxy will take forever to cure.

If the lumber is rough ten now is the time to push it through a planer (British English: planer-thickneser or over-and-under). Epoxy planes well (if dry).

Now the lumber is ready for finish.

For that, it is important to apply equal number of finish to both sides of the board before it is installed somewhere where only one side will be directly exposed to elements, for instance on a wall. Otherwise boards may cup, loosen the fasteners and further deteriorate from there. This has little to do with preserving the wood, especially larch, but skipping that may create uneven surface tension caused by finish to be only on one side. This leads to cupping.

Not sure what kind of finish you are looking into, transparent of opaque. If opaque then I'd still use epoxy to stabilize the knots but I would not fuss about the quality of scraping, but I'd finish the knot filing with half decent quality of wood filler, apply shelac and a coupe layers of topcoat.

If the finish is to be clear then it is a god idea to precondition wood with some kind of penetrating stain. The stain can be clear. For external applications these are usually semi translucent though. It all depends on the character you want to achieve. Don't use indoor grade stains as they offer little in terms of UV stabilization and will fade away fast. For external applications I'd settle for outoor penetrating stains since they stains can be reapplied every few (3 to 5) years. If you apply a film type topcoat then refinishing is peanuts but preparing for it is hell.

One very serious word of caution if you decide to stain (not paint with opaque paint). Larch, as most conifers, is prone to blotching. This looks bad and definitely like a paint job gone very wrong. There are some remedies tough. One is sanding the boards with a fine grit sandpaper, 220 or above. They have to be really evenly sanded. This sorta evens out the porosity of the surface and blotching is not as severe but it may be an overkill for external applications. Another technique is using sanding sealers. Don't use shellac for that. Won't last. Instead, use external grade varnish of low viscosity. Low viscosity can be achieved simply by thinning the varnish with the appropriate solvent. I'd use 6 parts of solvent to 4 parts of varnish. Almost watery and very penetrating. This evens out the absorption rates of the boards surface. Varnish must be fully cured before it can accept stain. Also, the grain will likely raise a little. Sand it down with whatever grit you're shooting for. If this is what you decide to consider make sure the stain can be put on top of previously finished surface. The instructions on the can will state that. They will also suggest if the stain can or should be topcoated.

Whatever you do, avoid polyurethane (inside or outside). First, it is mechanically bonded to prior layers, hence requires sanding between layer, unless previous layer is no more than 12 to 24 hours old. The thing won't even stick to itself. Second, poly is hard but it's not tough, i.e. it doesn't expand and shrink a the wood does. This causes blistering and flaking. Use spar varnishes instead. Morever, poly has nothing in terms of UV stabilization so it will basically look crappy after a season or two. If something is marked a marine grade (spar varnish) it is the best. Again, it's not about wood preservation from rot but about stabilizing.

I better finish now before this turns into a book.
OP SeanBM 35 | 5,797
3 Jul 2011 #7
The rule thumb is always test the finish you plan to apply to see if the sap is still a problem.

Apart from actually seeing the sap coming out, is there a way to test the wood to see how dry it is?

To store wood you need to stack it properly.

It's in an open, dry garage, so I think it should be fine.
each layer is stickered, I have about 320 M2 of it and I am going to be building a fence from the same wood (using concrete foundations with metal hardware, which will be about 360 M2 more).

Wax works very well, oil paint is great too.

I am using an oil based Teflon lacquer VIDARON produced by sniezka, I know a guy who bought lots of it and got a discount so I was able to get most of it from him but it isn't cheap 160 Zloty for 10 Litres (I got it for 80PLN).

So I was considering using something else for the fence, I was recommended a bee's wax with a stain.
Again it is larch wood but I have my doubts as to how protective bee's wax will be, as this will get the full extremity of the Polish weather. Have you any inexpensive material suggestions to protect the wood from insects, stain and weather protection?

If the lumber is rough ten now is the time to push it through a planer

The face is fairly rough, even though it was cut, so I am palm-sanding it. Nice advise for the epoxy, I am using it in another part of the house, it's really expensive here (65 PLN - 90PLN per mastic tube).

, it is important to apply equal number of finish to both sides of the board before it is installed somewhere where only one side will be directly exposed to elements, for instance on a wall.

Doh!, I was hoping to get away with once on the inside and twice on the outside...
I have already done the podbitka that way (it's amazing but I have forgotten many words in English these days, I am not that old... :) but it makes it difficult to explain things to English speakers). What's podbitka in English?

I am building the framing from treated green, quite wet wood, which I am hoping will not split when I screw it, using metal ankers, to the outside wall of the house.

opaque.

I am using a mix, two coats ofTeak coloured oil based teflon for water proofing and then (as was recommended) a insect repellent with a darker stain.

So I should be able to get away with dry epoxy or woodfiller, I hope.

Thank you very much D_Z, this is brilliant information.

I have another question, about the ends of the wood, they will overlap the tynk on the house, so I should cover the ends.
As I see it there are two ways of covering the ends of the planks of wood:
1. using premade corners (L-shaped in profile), these are very expensive, expensive enough for me to be able to buy the machinery (a good table saw and chop saw) for the second plan.

2. to cut out a 45 degree angle from the end of each horizontal plank at the ends and put in a triangular vertical piece of wood to fill it. I think it's the tools that also attract me to this idea, or as my wife calls them "toys" :)

3. I could make the L-shaped profile myself using two smaller pieces of wood but I am worried how this will look, as this wood also goes around the front door, so needs a bit of TLC.

Is it such a bad idea to leave the ends out? I was told that they will drink water, as that's how the tree lives and they should be covered. So I am looking for a way to finish the ends.

The style of the house is modern, I was told kinda Scandinavian looking, long and everything is horizontal. The wood will hopefully bring a more interesting, natural look, rather than just plain old tynk.

Again thanks for all the information, this is actually perfect timing, as the wood has been sanded and is stacked in a nice dry place out of the sun.

Something I find unusual about Poland is when I wanted to buy the wood, for an example, they give all prices in M3 and then you have to work out how much you need by working it out. It's the same with most materials and can cause lots of confusion, for my poor little brain ;)

I am not saying that Ireland doesn't have it's idiosyncrasys but I just thought I'd mention it.
Wroclaw 44 | 5,369
3 Jul 2011 #8
Apart from actually seeing the sap coming out, is there a way to test the wood to see how dry it is?

there is such a thing as a moisture meter, but i've never seen one in Polish shops.

u don't want bone dry wood.
OP SeanBM 35 | 5,797
3 Jul 2011 #9
moisture meter

I know the one but I don't want to buy one just for this, perhaps there is an alternative?

u don't want bone dry wood.

Apart from the splitting problem, which I assume can be avoided with first drilling pilot holes, then screwing in, why would bone dry wood not be good?

I don't think the wood is that dry but I am just curious.

I will be using an airgun with headless nails on the tongue part of the the tongue and groove to hide them from view.
ender 5 | 396
3 Jul 2011 #10
moisture meter

That because proper name is Hygrometr. Higrometr (wilgotnościomierz-trudne słowo) in Polish. Because of hygroscopic nature of wood? As long as you drying it in natural conditions shouldn't be problem.
Wroclaw 44 | 5,369
3 Jul 2011 #11
a site like this will help understand moisture content: globalwood.org/tech/tech_moisture.htm
z_darius 14 | 3,964
4 Jul 2011 #12
It seems like you actually know what you are doing :)
Stop me when I'm saying things that are obvious to you.

I am using a mix, two coats ofTeak coloured oil based teflon for water proofing and then (as was recommended) a insect repellent with a darker stain.
So I should be able to get away with dry epoxy or woodfiller, I hope.

pre-drill holes in wood with a drill bit dia. the same as, or a hair larger than, the screws/bolts. If you use washers under the screw/bolt heads that would can split all it wants; it's not going anywhere. You may have to countersink for washers with a Forstner bit, not with the typical countersink one. If the framing timber is more than 4" I'd look into two anchors per width to restrict cupping from uneven moisture conditions on either side of the timber.

Doh!, I was hoping to get away with once on the inside and twice on the outside...

I am using a mix, two coats ofTeak coloured oil based teflon for water proofing and then (as was recommended) a insect repellent with a darker stain.
So I should be able to get away with dry epoxy or woodfiller, I hope.

Wood fillers are often advertised as "stainable". I have yet to see one that really is.

Since I have no idea about that teflon thing and how it would affect the knot esthetics I would revise the epoxy technique. Have some very fine ash ready. Ash as in burnt wood or paper, not wood species. By fine I mean flour fine. Salt grains would be much too thick. Use a coffee grinder to make 1/2 cup or so.

I usually work with two part epoxy and when I make a mixture I add even parts (by volume) of resin, hardener and ash. I mix that well (stirring for at least a minute) and the substance, when hardened, makes knot gaps turn into some handsome and natural looking dark lines. The oil part of your teflon finish will stick to it well. If you stain it the adhesion is irrelevant sincethe filler will be darker anyway.

When filling the knots don't try to make a perfectly smooth patch over the surface of the knot. Instead, pour little blobs of epoxy along the lines to be filled and push the excess toward the centers of gaps. It will go down, settle around the knot and keep it nice and snug. You will likely have to repeat the process to fill the small ridges resulting from the epoxy flowing downwards. Again, remember about the tape on the other side. Otherwise you will epoxy your material to the work surface, or you will end up with a big blob of epoxy on the floor. Keep the material flat until epoxy dries.

Back to teflon - this is something where I have to back off. I never worked with teflon and for what I do I never would. I want to make sure you take this as what I would or wouldn't do for me, not as a suggestion to abandon the idea for your project. Although the idea seems fishy to me as few things seems to stick to teflon. Will the stain? I really have no answer because I am unfamiliar with this technique and the likes of teflon or silicone have no place in a woodworking shop.

It sounds great for external finishes though. Only make sure you there is material compatibility between different finishes (teflon, stain, the bug repellent). Call the manufacturers to confirm local wisdom. Also make sure about the sequence of application. If teflon is so good for water proofing that means it is an anti-penetrating agent. If so, then what exactly is the role of the bug repellent (hope it's not arsenic based) if it won't penetrate wood and thus will be washed out after a rainy day or two. Same for stain.

Or I might have it altogether wrong due to my ignorance about the product.

At any rate, my suggestion about the same number of coats on both sides is critical when it comes to film finishes (poly/varnish/acrylic). Penetrating finishes (stains) do not create nearly as much surface tension so one good application on the inside of the wood should do it. If that teflon is penetrating then I wouldn't loose sleep over applying just one generous coat on the inside surface.

Just to make sure I have a clear picture. By "ends" you mean... well ends, not edges. The ends point downwards and someone suggests wrapping those ends with some type of J-channel.

I would just 45 them and make them absorb as much of that teflon stuff you got there as possible. Wood "drinks" water through its ends but capping them can cause more trouble since now water, which WILL get in there, may never get out of there and this will cause rot. Things will look good for a few years and then rot will start showing up. I saw enough of those corner J-channels that ended up falling off because after a few years there was no wood to hold them anymore. Most water damage occurs behind those protective aluminum elements around roofs. To put it simply, those channels do not prevent damage, with some exceptions due to the nature of water flow. They hide it for as long as the damage does not extend beyond the area they cover.

I just went out for a smoke and I looked at my garden tools shed. Corners, overlapped and solely decorative elements, are made of cheap pine strapping, 5/8"x4". I built that shed 5 years ago and I only used one coat of penetrating stain. No checking at all. The same goes for my backyard gates. Cheap pressure treated material, 20 years old. It's got a lot of beating over the years. Not a trace of checking.

I am planning to replace them with white oak over steel frame. White oak is great for the outdoors, but not as resistant to rot as the larch you are working with. Larch resists rot even in contact with the earth (!!!). That is rare and a huge benefit. Make sure you do more research on larch itself. Perhaps you can skip some of the chemicals without paying one bit of a penalty in quality and durability. Maybe you could tint the teflon thing and skip the staining step? Call the manufacturer, or see if they have a website with advice.

If you want "toys" then I would definitely go for #2. I would present this solution to wifey as the only feasible one, even if down the road it wouldn't prove to be such a good idea. The "toys" would stay with you though ;-)

The best timing for that is in the middle of the project:

"Honey, I'm stuck. I need {insert the name of the tool you want}".

Always works for me. Usually, before I even get to the store she calls on the cell and makes sure I don;t get some cheap tool. "Get quality".

One general piece of advice I was given years ago, and I use it sometimes, is not to try to hide potentially troubled areas. Make them a part of the design instead. All those little groves, recesses, moldings etc you see often play two roles - add to the character of the design and hide crappy glue lines and inconsistencies in the grain patterns. Look at your design and try to visualize it. Or better yet, draw it in 3d with google Sketchup. Highly recommended.

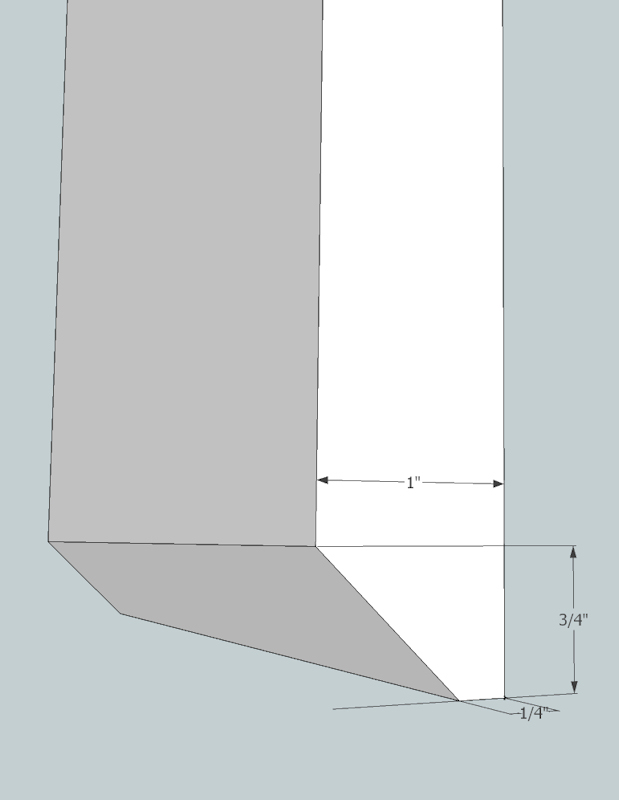
In the long run it saves a lot of time and material as you can actually see what you need and how things will look in 3d. It helps you create bill of materials (automatically with the pro version ($500), or manually with the free version. Learning curve is not very steep. 15 to 30 minutes and you're in business. Plenty of video tutorials on youtube. I'm attaching a sample overview of the bottom part of a board. That one is simple, about 2 minutes to draw, but sketchup can be used for much more complex designs such as your entire property with the house and all rooms in it. Filled with furniture too.

Something I find unusual about Poland is when I wanted to buy the wood, for an example, they give all prices in M3 and then you have to work out how much you need by working it out.

I buy by board feet here.
1 bf = 144 cubic inches (1"by12"by12") so the measure is cubic too. I find bf easier though as I can ballpark what I get by envisioning actual boards which are usually sold in widths of 8 to 12 inches and lengths of 8 to 12 feet.


z_darius 14 | 3,964
4 Jul 2011 #13
For MC, the rules may vary from region to region and depending on the application. I looked at the suggested link and I gotta say that 18% MC for indoor applications is a little too high. Come Winter, the heating season and those boards go crazy. A dining table, 44 inches wide, I made last Summer shrunk 3/8". The lumber was 11% MC when I started working with it. I did consider the shrinkage in the design so the table is still here, but I saw an utter disaster where a table top literally exploded upwards along the fiber lines, and with a bang bang at that. Dinner was lost, the ceiling had to be repainted.

Side note, in case you were unaware, wood does not expand lengthwise, only in width. Well, not to any measurable extent.

Here, for indoors 15% is considered dry. I use wood when it's 10 to 11%, although when I take it out of the kiln it is usually around 7 to 8%, then it reabsorbs some. Hence, never work with wood directly out of the kiln. Too dry is dangerous. Wait a couple weeks so it has a chance to stabilize to the environment.

For the outside MC is not as important but should not be above 20%. I opt for 15% simply because it machines better than 20% and the future fluctuations are not as critical. Exterior joinery doesn't need to be as tight so wood movement is less of a problem. Also, if the wood has direct Sun exposure the MC will go down drastically. I checked some of my outdoor wood structure to be at 5% MC on some hot days!

One exception for your application is the timber that will hold the facade. I'd go for max 15% MC since the environment behind the facade will be relatively stable. It will accept ambient moisture but no direct water from rain. Also, if the stucco (tynk) is not covered with plastic sheets, then it will compete with wood for moisture. I hope there is some vapor barrier between the foundation and the walls.

If you don't want to spend money on yet another toy (they are not cheap) then you can use a manual method described here:

woodweb.com/knowledge_base/Measuring_MC_by_weight.html

Pretty involved so I decided to spend $300 instead :)
OP SeanBM 35 | 5,797
4 Jul 2011 #14
few things seems to stick to teflon. Will the stain?

Reminds me of the amusing question, "If nothing sticks to teflon, how do they make it stick to the pan?".
I imagine it's something got to do with in what state it's applied but I don't know.

Also make sure about the sequence of application.

I had the exact same question and the friend of mine, who I bought the stuff off, s'wife works in śnieżka and they spoke to the the creators of the stuff and apparently you put the stain/bug/mould repellent on after. The mind boggles but I have done a few tests and the stain works after the teflon, so we will see (feels like fatal last words, I know).

I will check the ingredients for arsenic.

Get quality

Sound advice :)

I would just 45 them and make them absorb as much of that teflon stuff you got there as possible.

I have simply forgotten the correct words but I was considering routing two discs holes into the ends, where two board meet at a corner, both cut at 45 degrees to match up and epoxy glueing coin like pieces of wood into the holes. Mainly because I don't want the corners to buckle.

Is that over kill? I could just nail them into the corner frame but I wouldn't get a new toy for that :p

draw it in 3d with google Sketchup. Highly recommended.

Great idea, the fence especially has a bit more to it.

Oh, I am also trying to bend a quarter of a circle, to round off the fence in to the garage.
Here I am definitely out of my depth, I was thinking that 22mm thick 2.5 metre length peice of wood would go bananas, so I was thinking of using 4 or 5 5mm pieces glued together and left in a few vices.

I am not sure if this will work at all but it would be excellent if it did.
Have you any suggestions for fixing a horizontal bend on about 11 pieces of wood? or am I just asking for too much?

the measure is cubic too.

Is nowhere sacred? ;)

I find bf easier though as I can ballpark what I get by envisioning actual boards which are usually sold in widths of 8 to 12 inches and lengths of 8 to 12 feet.

I can only envisage a metre width, length and breadth, so pretty useless unless I am going to build a solid cube.

If you don't want to spend money on yet another toy (they are not cheap) then you can use a manual method described here. Pretty involved so I decided to spend $300 instead :)

Hhmmm, I will ask around, see if anyone has a MC Hygrometr.

Thanks again Z_D, you're a wealth of information.
z_darius 14 | 3,964
5 Jul 2011 #15
OK, I misunderstood what you needed.

The term you're searching for is biscuit and the tool needed for those is biscuit joiner. I am not a big fan, mainly because it is the weakest of available glue joints. It also has a bad feature of swelling when glue (or moisture) is added. That would certainly be a problem outdoors. Also, even if you saturate the joint with epoxy thee is still a real chance moisture would not only swell the biscuits to the point that their imprints might show on the outside of the joint. Biscuit would also create stopping points redirecting the flow of water from downwards to, possibly, the other side of the joint and only then again downwards. That would be contrary to a requirement to minimize the amount of water that gets between the facade and the stucco wall. This may not seem very probable, but I have seen how droplets of human sweat under a shingle cause a flooding of a basement.

In short - nah.

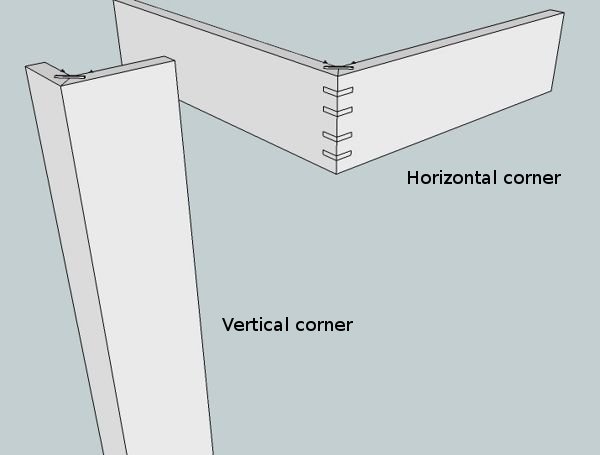
Now, the 45 degree thing is called a miter joint. Alone, they are very weak if applied to end grain. Extremely strong when applied to long grain i.e. two boards glued together in parallel. For long grain you don't need any additional tricks as the gluing area is very large. Still, considering the outdoor character of the project you might indeed consider some other methods.

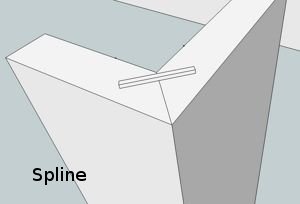
Below I attached pictures illustrating the two sensible approaches. Only one of them makes sense for long grain (vertical) joinery and that is the spline. The picture shows it a little extruded for clarity only. The spline would be made of exactly the same lumber so there would be no problem with varying degrees of dimensional stability of the connected members and of the connector (the spline).

The spline would run along the entire length of the joint. This helps align the corners and it also provides a mechanical barrier from water, which with this join will always flow down without interruptions. Spline can be cut on the table saw (ts) and so can grooves that would accept the spline. Naturally, the grooves wold be cut after chamfering (cutting at 45 deg) of the long edges.

Spline will also work for end grain miters (horizontal corner). In fact tis is the scenario where is is mainly used as in cabinetry it makes no sense for the long grain joints.

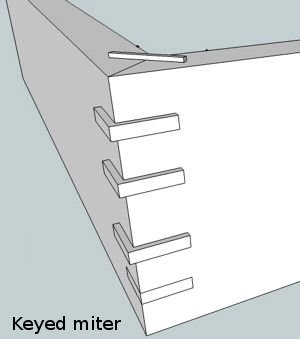
Another method useful for the horizontal corner is the keyed miter. It is easier to make and it offers no less gluing area i.e. strength. I use it especially for picture frames and small, thin waled boxes where spline is out of the question. Keyed miter is useless for the long gain joint (our vertical corner) since after cutting the slots for the keys we would be gluing long grain (the keys) to end grain (upper and lower surface of the slots). That simply won't hold with PVA glues, but it would with epoxy. There is also a question of style and such. Again, these are shown extruded but the extrusions would be normally chiseled and/or sanded off.

With keyed miter the thickness of the key is irrelevant. Al that counts is the glue area, i.e. how deep into the corner it goes. Hence, the openings for the keys can be made as thin as the blade of a hand of mechanical saw and that makes it possible to do them onsite and in place. In fact the horizontal corner set would be hard to carry from the shop to the outside of the house if the boards are long.

The situation is different with splined miters. Due to a fair degree of precision reqired, the glue-up should be done in the shop where you can use clamps a little easier and have better control over the precision. An assembled set we call the vertical corner would become... well... a corner "stone" from which the remaining boards would be installed.

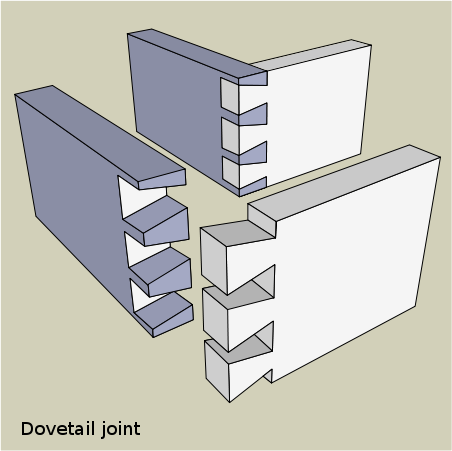
I'm attaching two other joinery methods, but those would be definitely an overkill and a lot of work, especially for the vertical corner. I use those mainly for drawers if I want to show off. And then there are a few more and their variations and styles.

Oh, I am also trying to bend a quarter of a circle, to round off the fence in to the garage.

I'll take it simply as bending wood.
First of all, it depends on two main factors - thickness of your lumber (I know, it's 22 mm) and the radius of the bend. 22 mm is not trivial and I have only a vague idea about the bending properties of larch. One of the methods you are already aware of - laminating a bunch of thinner pieces together and gluing them against jig layer by layer. You won't know until you try.

However, if wood was kiln dried it is much harder to bend. Than air dried, or better yet, only partially air dried are better choices. All is not lost tough as moisture, lots of it, can be injected back into the wood. You need a pipe/tube the diameter of the lumber's width and as long as the piece you want to bend, a kettle, a hose. The board goes inside the pipe/tube and is capped on one end. The cap has a receptacle for the hose. This is the receiving end to which you connect a hose whose other end is connected to the kettle's spout. The other end of the tube is open. The water boils, goes though the pipe on the other end while heating up the board and saturating it with water. About an hour per inch of thickness. I'd go for two, just in case. Keep an eye on the kettle so it doesn't run out of water. Have a another pot going in case you need to refill the main kettle. That way you don't give the wood spikes of steam/no steam.

Have the pattern, clamps (lots of them) and thermal gloves ready ahead of time. My wife still can't find her kitchen mitts :). Depending on the radius of the bend you may need to clamp every for inches or less. You need to work somewhat fast.

You could (doubtfully) get away with one solid piece (22 mm), but I'd go for at least two. You can steam them all at the same time, or do them one layer at a time. This would take about a day per layer as you want to make sure the wood is dry before you take the clamps off. Make sure the layers are absolutely snug against one another along the entire gluing surface. Otherwise water will get a solid foot in the door and, together with the Sun, it will start working on undoing your work.

After a piece is done and dry i will bounce back a little, but nothing to worry about.

Another method, less stressful I think, involves a router and/or bandsaw or jig saw. Draw the desired shape on a cardboard. Using a bunch of sort pieces, glue them together they follow that pattern but with a margin going beyond its border. You'll end up withe a clumsy glue-up, very roughly following he desired bend, but wider than needed. Use a router or a bandsaw to follow the cardboard pattern. If the arch is wide then you may need to create first one that follows the pattern's shape but is not as deep/wide as you need (I imagine 4 to 6 inches). To achieve the required depth make 4 to 6 of those arches, stack them together on top of one another for gluing. Before gluing them together though, you might want to make one of them exactly as required, sanded and all. You woud then use that piece as a guide (router+pattern bit) to make identical copies out of the other pieces. Don't try to chew to much in one swoop with the router. Cut the other pieces (bandsaw/jig saw) with about 1/16" to 1/8" margin compared to the first, nicely sanded piece. After that the routing will be a piece of cake. Wear goggles.

That's all for now and I ain't checking for typos.

This would be a very stable and lasting arch, as most laminated pieces are.


OP SeanBM 35 | 5,797
5 Jul 2011 #16
I misunderstood what you needed.

Sorry, I am fierce busy these days and am not explaining myself very well.
I have different parts of the facade for which I have different ideas on how to handle.
I think you understand me perfectly, which is an achievement.

The term you're searching for is biscuit

In short - nah.

That's it! and it's great you told me that, I thought it was much stronger than that.

the 45 degree thing is called a miter joint. Alone, they are very weak if applied to end grain.

Yes, these will be horizontal laid endgrain joints meeting at a corner.

I will be building wooden framing 12 cm out from the wall and insulation with folia will be in between the facade wood and the brick wall.

There is also a question of style and such. Again, these are shown extruded but the extrusions would be normally chiseled and/or sanded off.

I will do a test of this joint, as I am not sure about the final look.
If I understand it properly, it is kind of like a biscuit joint in reverse?
My initial doubt is that where the end grain shows on the key, the stain will look a lot darker and out of place but if I do it well, it could look add to the look.

Testing will be needed.

One of the methods you are already aware of - laminating a bunch of thinner pieces together and gluing them against jig layer by layer. You won't know until you try.

I just don't want, in a year's time, for shards of splinters to spike out...

Another method, less stressful I think, involves a router and/or bandsaw or jig saw. Draw the desired shape on a cardboard. Using a bunch of sort pieces, glue them together

This sounds like a more reliable method.
I knew I should have done wood work in school but how do you glue the short pieces together length ways?
Or have I misunderstood you?

Your advice is invaluable and will save me a lot of aggravation, thanks!


Home / Life / Building: treatment methods of and understanding timber in Poland